Thursday, September 30, 2004
Windows 2000 offers a zillion different ways for you to do the same thing. Here are three ways to access the Undo option, which unspills the milk you've just spilled.
- Click on the word Edit and then click on the word Undo from the dropdown menu. (This approach is known as wading through the menus.) The last command you gave is undone, saving you from any damage.
- Press and release the Alt key, then press the letter E (for Edit), and then press the letter U (for Undo). (This Alt key method is handy when you don't have a mouse.) Your last bungle is unbungled, reversing any grievous penalties.
- Hold down the Ctrl key and press the Z key. (This little quickie is known as the shortcut-key method.) The last mistake you made is reversed, sparing you from further shame.
Don't feel like you have to know all three methods. For example, if you can remember the Ctrl+Z key combination, you can forget about the menu method and the Alt key method.

Organize Your Documents
Do you dump every file you create into your My Documents folder? Is it the digital equivalent to a messy 7-year-old's room? Well, never fear, the computer cleaner is here! (And I can't believe I just said that, much less going to publish it.)
Anyhow, the best way to keep things organized is not to create any documents in the first place. Think about -it - no docs, no mess. After all, you only got a computer to read this newsletter right? Right??
OK since that probably won't work for ya, let's go with the second best way. Try setting up sub-folders inside the My Documents folder. Make one for each "category" of document that you have.
For example, you could have a folder for letters, one for invoices, another for sales letters, and so on. It makes keeping track of stuff much easier. Here's how to set it up:
1. Click the Start button, Documents, My Documents (XP users, hit the Start button, My Documents). This should open your "My Documents" folder.
2. Create a new folder with an appropriate name (right-click any blank area and select New, Folder from the resulting menu).

3. Finally, drag any documents that belong in that folder to it. That's it. You can create as many of these little sub-folders under the "My Documents" folder as you need.
Oh, one final suggestion - you may want to make yearly folders too. For example, at the end of this year, make a folder called "2002 Docs". Then move everything you've made (folders and all) into that folder. Gives you a fresh start for the new year. (OK, so it's the Windows equivalent of shoving toys under the bed, but who cares? It works!)
Wednesday, September 29, 2004
Platform- WinXP General Tip Skill- easy |
|
|
|
|
|
|
| If you get bored of the default windows mouse pointer..
Go to Start>>Control Panel>>Double Click Mouse>>Pointers Tab>>Click on Down arrow next to schemes... choose a scheme to see what kind of pointers it includes. Once you've decided click on Ok to make it go into effect |
Avoid the Recycle Bin |
|
|
| To delete files without sending them to the recycle bin, select
the file or files to be deleted. Right- click the selection and hold the Shift key down while selecting Delete. NOTE: If you avoid the Recycle bin, you will not be able to recover the files that avoided it.. |
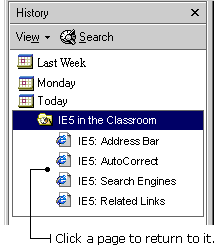
A Web site is made up of Web pages. Some Web sites have only one page, while others are composed of dozens of pages. The History list keeps track of which Web pages you've visited and organizes them in a variety of ways.
To view links in the History list by date:
1) Click a week or day in the History bar. A list of Web site folders appears.
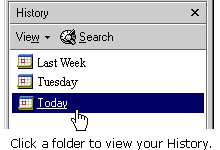
2) Click a Web site folder to display individual pages, and then click the page icon to display the Web page.
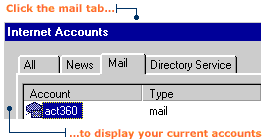
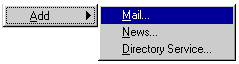
Saving Mail in Outlook
You can save outgoing mail in Outlook 2002 so that you can go back and look up the messages you've sent. Outlook starts saving sent items when you install the program, but you can turn this feature on and off.
To save copies of your messages:
Choose Tools, Options.
The Options dialog box appears.
Click the E-mail Options button.
The E-mail Options dialog box appears.
Click the Save Copies of Messages in Sent Items Folder check box.
If the box already contains a check mark, leave it alone. (That's the way Outlook is set up when you first install it.) If you click the box when it's already checked, you turn off your option for saving messages. Don't worry if you make a mistake; you can always change it back. Just make sure a check appears in the box if you want to save messages.
Click OK.
Outlook saves two months' worth of saved messages and sends older messages to an archive file to save disk space on your computer.
Monday, September 27, 2004
|
| Windows XP and the MouseMake the Pointer Easier to SeeSUMMARY: A Control Panel Tweak to make your Windows XP mouse easier to see.
|
You already love Google, I know. It's the first stop on an information quest. After learning about Google's features, you're going to love it even more. Google searchers who already have taken the time to poke around on the search engine may be familiar with these advanced operators. Don't let the word "advanced" scare you away. Using these tricks involves a little memory recall but no technical prowess. For instance, let's say you're reading along and you come to the word "pulchritudinous." Smart though you happen to be, this lexical tidbit hasn't crossed your radar yet. Google to the rescue. Type "define pulchritudinous" into the Google search engine, and in two clicks you'll know it means "characterized by having great physical beauty and appeal." Or, if you wish to know how a particular stock is faring, enter its symbol into the Google search bar. Enter a three-digit area code into Google, and Google will offer you a map of that area in return. A search can be narrowed to only the title of Web sites by typing "Intitle:" before the search terms (no space). Alternatively, a search can be narrowed to only the text of Web sites by typing "Intext:" before the search terms. "Related:www.observer-reporter.com" will return sites similar to www.observer-reporter.com. Google would like to supersede the Yellow Pages, too. Type "pizza Washington, Pa" to find phone numbers, addresses and Web pages (should they exist) for pizza joints in Washington. Type "rphonebook:" for residential listings and "bphonebook:" for business listings. To check the status of a flight, enter the flight number into the search bar. Google is a historian, too. Say you want to visit a site that no longer exists. Google may have saved a copy of it. Type "Cache:" before the name of the site to call up that copy. Calculations can be performed in the Google search bar, too. Google can add, subtract, multiply, divide and perform square roots, among other things. Enter "half a cup in teaspoons" and Google will tell you that there are 24 teaspoons in a cup. Since Google allows people to play with its technology, encouraging innovation, there are other sites out there that repurpose Google's search technology, some to advantage and others to waste. Google Alert (www.googlealert.com) runs daily Web searches on Google and notifies the registrant of any changes in the Google Web index. A public figure might sign up for mentions of his name; a business owner might want to be kept apprised of how often his business is mentioned online. Google Hacks (douweosinga.com/projects/googlehacks) may entertain you, but they aren't of any great use. Google Talk tries to finish a phrase for you; Word Color is a Windows Program that tries to determine the color of a word or string of words. Jessica Smith is technology columnist and online editor for the Observer-Reporter. Her e-mail address is: editorOR@observer-reporter.com.
Wednesday, September 22, 2004
Virus Terms
Certain terms used to describe online threats can be confusing. Here's an easy understand glossary of commonly used words that are related to Internet security.
Virus: A program that replicates itself across a network, or the Internet. The virus payload may be destructive, like deleting files, or it could simply try to overwhelm a network by copying itself. A Virus typically spreads itself by attaching itself to emails that it sends out using your address book on your computer. The virus will randomize the To: and From: fields of the email it sends out in order to keep people in your address book from realizing and warning you that YOU are the culprit that has been sending all that virus-infected email to them. In general do not open any attachments unless you are expecting something from someone you know.
Virus signature: The "fingerprints" of a virus, which antivirus programs use to identify and isolate viruses. Users should regularly update their antivirus programs online to download the latest virus signatures, so they're protected against new viruses. Typically most virus software companies give you a 1-year subscription to their servers to download these virus signatures. BEFORE this subscription expires you must renew your subscription in order to keep your virus signatures up-to-date. Anywhere from 2 to 10 new viruses are discovered each day and if you do not have the latest virus signatures your chances of getting infected increase every day.
Worm: A virus that replicates itself without human intervention. If the victim has to open an e-mail attachment to get infected, it's a virus. But if it scans for new victims and attacks by itself, it's a worm. Worms spread through a network and will typically infect every computer attached to that network unless that computer is protected by some Antivirus software.
Trojan: A program that doesn't necessarily replicate itself, but like the legendary wooden "Trojan horse" is much more than it appears. A Trojan program might look like a game, but instead it steals your personal information and sends it to a criminal.
Password sniffer: A file that seeks out passwords on your computer, then sends them to a hacker. A keylogger can also grab anything typed on the keyboard.
Blended threat: A program that combines the characteristics of viruses, worms and Trojan horses. An example of a blended threat was the Nimda virus outbreak.
Exploit: A program that takes advantage of a security hole in a computer program, like Microsoft Windows or AOL Instant Messenger.
Spyware / Adware: General terms for a program that surreptitiously monitors your actions. While they are sometimes sinister, like a remote control program used by a hacker, software companies have been known to use spyware to gather data about customers. Spyware typically seizes a great deal of your CPU's processing time and Internet bandwidth eventually slowing your computer down to a point that it will be rendered useless to you. A main source of spyware comes from allegedly free programs that you be download off the Internet. One of the primary sources of spyware is from free versions of Music Sharing programs such as Kazaa, Morphis, Bearshare, Limewire, Madster, Grokster, and WinMX to name a few. Even Real Player and Windows Media Player have components that are considered spyware.
Ink Jet Or Laser? |
|
|
| If you are trying to decide between a laser or ink jet printer, there
|
Monday, September 20, 2004
Close That Window
Have you ever found yourself on the internet when suddenly a full screen advertisement pops up and you can't find the X to close it?
I hate it when a web site tries to trap me with a full screen page with no visible way to close the page.
With this tip, you won't be stuck again. Simply click once on the offending page, then hold down the "Alt" key on your keyboard and press the "F4" key. This will close the window that you just clicked on.
To help you remember, just write Alt+F4 on a sticky note and stick it on your monitor.
Saturday, September 18, 2004
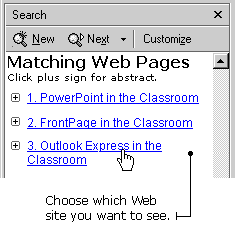
Use Related Links
Imagine that you do a search and then look at your list of returned links. You click on one of the links and a Web site downloads into the main IE5 window. The site looks pretty interesting, but it's not exactly what you were looking for. You decide you want more information on the same subject. IE5's Related Links feature will give you a list of links to Web sites that are similar to the one in the main IE5 window.
To see a list of related links:
1) Make sure you have a Web site in your main IE5 window.
2) Click Tools on the Menu bar, and choose Show Related Links. The Search window opens on the left side of the screen. Inside is a list of related links.
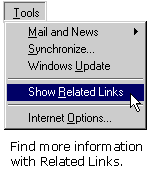
3) Click on a link to visit one of the related Web sites. The new Web site appears in the main IE5 window.
Schedule Saves
You can get IE5 to notify you when new content is added to Web pages on your Favorites list. You can save the page and then view it in IE5 when you are offline - that is, not connected to the Internet. This option is valuable when you have limited access to Internet dial-up lines. It also lets you know when new information is available, so you don't have to keep returning to the site to see if anything has changed. This process is known as "synchronizing" a Web page.
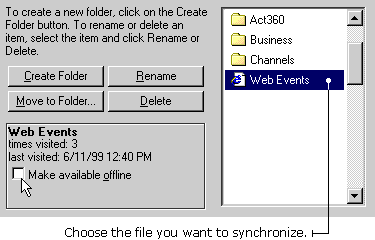
To synchronize a page from your Favorites list:
1) Click the Favorites button on the toolbar. The Favorites lists appears in the left-side window.
2) Click Organize Favorites. The Organize Favorites dialog box appears.
3) Select the file you want to synchronize. A Make Available Offline check-box appears on the left side of the Organize Favorites dialog box.
4) Click the Make Available Offline check-box. A Properties button appears under the Make Available Offline check-box.
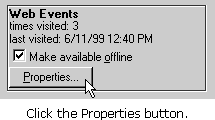
5) Click the Properties button. A Properties dialog box appears, containing the name of your link.
6) Click the Schedule tab. Click the radio button beside "Only when I choose synchronize from the Tools menu."
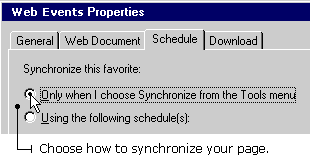
7) Click OK on the Properties dialog box.
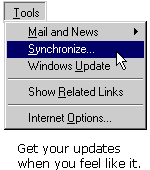
8) Click Close on the Organize Favorites dialog box.
TIP: To get your updates, just click Tools on the Menu bar and choose Synchronize. IE5 will visit the pages you have synchronized and download new information for you.
Saving Text (Words)
As you surf through the Web, you'll find a lot of things you'd like to see again later. You might even want to save something to share with a friend who isn't connected to the Internet. IE5 lets you save text or images from the page. This snappy program even lets you save entire Web page--images and all!
To save text from the Web:
1) Select the text on a page by holding down your mouse button as you move over it. A highlight block appears over the text.
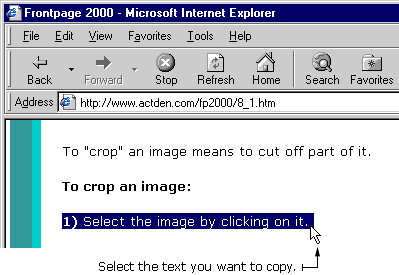
2) Press the CTRL key and the C key on your keyboard at the same time. This action copies the text.
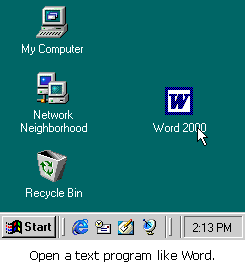
3) Open Microsoft Word or another text program.
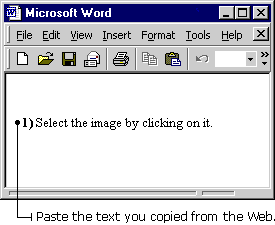
4) Place your cursor into an open Word page.
5) Press the CTRL + V keys at the same time. This action pastes the text onto the page.
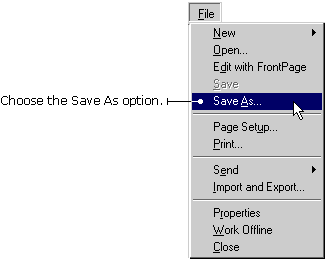
6) Save the text in Word.
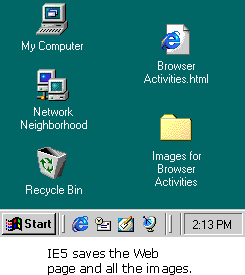
Saving an Entire Web Page
To save an entire Web page:
1) With the page open in IE5, click File on the Menu bar and choose Save As. The Save As Web page dialog box appears.
2) Double-click the folder where you want to save the page.

3) Type a name for the page in the File name box.
4) In the Save as Type drop-down box, select Web Page, complete.
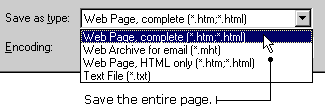
5) IE5 saves the page and stores all the pictures in an images folder.
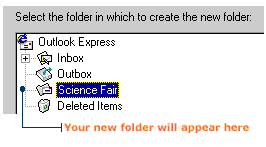
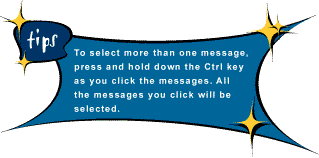
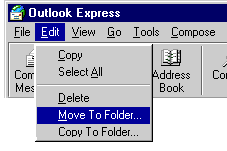
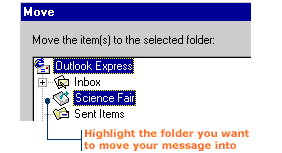
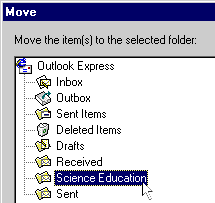
E-Mail Add a Folder
|
| |||||||
| |||||||

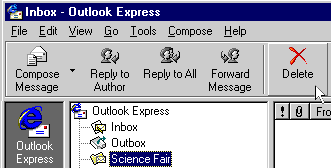
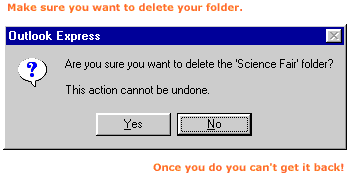
|
| |||
| |||
|
| |||
| |||
|
| |||
| |||
Clearing Cache
When you go to Web pages, IE5 saves them in a temporary folder called a "cache" - pronounced CASH. Then, when you return to these pages, you don't have to wait for them to load into your computer. Instead of the usual wait, you'll see the pages and images load very quickly. Why? Because the files are already in your computer - in the cache. You don't have to pull them one-by-one from the Internet.
But a cache can fill up. When this happens, pages do not load as quickly. You can speed things up again by cleaning the cache. When you "clean the cache," you delete all the Web page files that is stored in the cache.
To clean the cache:
1) Click Tools on the Menu bar and then choose Internet Options. The Internet Options dialog box appears.
2) Click the General tab.
3) Click the Delete Temporary Files button in the Temporary Internet Files section. The Delete Files dialog box appears.
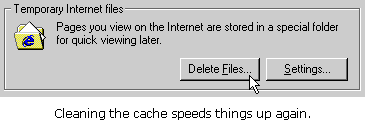
4) Click OK in the Delete Files dialog box.
5) Click OK in the Internet Options dialog box.
URL--Auto Complete
E5 keeps track of Web sites you've visited, so you don't have to type in the entire URL every time. If you want to return to a site you've seen before, you can type part of the URL and AutoComplete will give you a list of possible matches from sites you've visited before. To visit a Web site using AutoComplete: 1) Begin typing the URL into the Address bar. As you type, AutoComplete lists possible matches in a drop-down box under the Address bar.
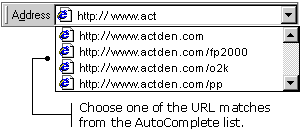 2) Click one of the URL matches to go to the Web site you want to see. You can also turn off the AutoComplete setting. To turn off the AutoComplete setting: 1) Click Tools on the Menu bar, and then choose Internet Options. The Internet Options dialog box appears.
|
|
|

![]()